Thursday, November 25, 2010

G'day Mates!

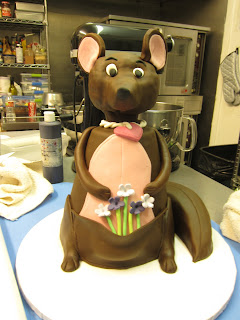
Given that I had some extra time last week, I took to creating a three-dimensional kangaroo cake for a regular customer. The original plan was to make a 2D shaped kangaroo,but I decided to surprise her by going all-out instead!

Now, planning and constructing a cake of such enormity was no easy task - fondant is a tricky material to work with, and an oddly-shaped cake often calls for a more cautious approach and tedious execution. Yet despite the challenging nature of the project, it was still one of the most fun and unique challenges that I have ever undertaken. Witnessing the client's reaction of surprise and delight upon receiving it was definitely the most rewarding part of the experience.

The structural design of this entirely-edible marsupial was roughly modeled after the character "Roo", from Winnie the Pooh, as it was intended to have more of a whimsical, animation-inspired appearance.

The core of the body and tail consisted of tapered layers of moist pumpkin cake, sandwiching and coating with our signature cream cheese frosting before being covered with various types of fondant.
 The head and limbs were sculpted from Rice Krispie Treats before receiving the fondant treatment as well.

Here is a  mini tutorial for our "Roo" inspired Kangaroo:

I baked two half sheet pumpkin cakes. The cake will serve about 20 adults after the carving process. Make different circle cake templates from parchment paper. I used the tail from the cake scrap.

Stack the different layers of cake with cream cheese. Move on to the tail part, repeat the same procedure as the body part.

Crumb coat the tail part, let it set for 30 min in fridge. In the mean time, prepare different fondant colors (chocolate, pink, green, purple, lavender).

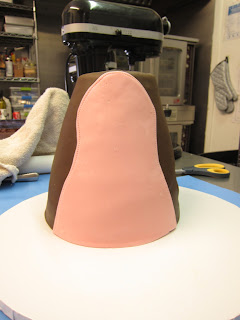
Once the body and tail set, cover them with the chocolate fondant. Add the pink accent for the belly part, chocolate for the legs and arms.0


Don't forget to add the pouch! Repeat the same procedure for the tail part, add little stitches design. 

Mold the kangaroo face using rice krispies, cover it with chocolate fondant and don't forget to add dowel in the middle for support.


Attach the face and the body using a dowel, add a little princess necklace "P.O.A" ( Princess of Australia)!


Finally, I added some fondant facial features, silver crown, and girlie accents at the request of the customer, and voila! The kangaroo was ready to (carefully) hop on over to the party! Happy Birthday Angie!

Monday, November 15, 2010

Baby Baby and Baby fever!

Do you know when they say your biological clock is ticking? I think I am one of them now. Most of the party that I went to this year were for baby showers! The past two weeks were for baby showers back to back. Everybody around me seems to be having babies. At the shop most of the cake were baby shower cakes. I think I am having baby fever!

Here are few of my favorites from this past weekend. A baby block cake - It was my first time making it. It looks simple but it definitely took more hrs than I thought. I baked 3 half sheet cakes, then cut them with my parchment templates (8" square), stacked them high (8 layers) with buttercream, and let it sit overnight. One side was too high and it slanted to one side. So, I carved it to make it look straight. Let it cool off again in the fridge. Then the fun times begin, decorating with different colors of border and the baby initials.

Here are the details:

 After cutting the half sheet cakes with the parchment paper templates, layer the cake with simple syrup and vanilla buttercream.

The cake was high (almost as tall as my kitchen aid), and a little slanted, so I carved it out before I covered the cake with final coat of buttercream. Then, let it get hard in the fridge. In the mean time, I started making the colored borders and teddy bear.

Next, our client requested a very soft simple colored cake for a baby boy shower. This two tiered cake was a 6" round Italian cream cake, and 8" round lemon and cream cake  - vanilla cake with lemon cream cheese and lemon pastry cream - serves 30 adults. The color combination and design details are just clean, modern, but cute. I thought it's very " Anthropologie" ish theme. What do you think?


This next set of cookies are for baby shower too!
 Toile pattern sugar cookies in "A" shape for baby Audrey.  I didn't hand-draw the cookies. I used sugar paper instead. The mom picked this toile pattern that matched her baby nursery.

The next cookies was designed after Dr. Suess ryhme, one fish, two fish, and it was so many fish! My husband thought that this was a shark! of course I wanted to duck tape him right then (no I didn't do it!)

I made this green elephant cookies to match the baby shower invitations. I love it how it's all green with different tones and simple mendhi decoration.

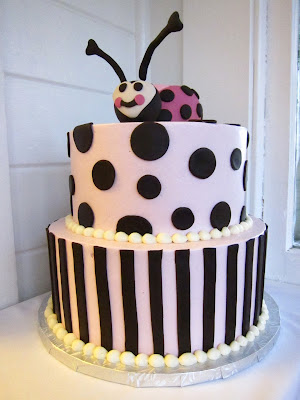
The next two baby shower cake was modeled after our children birthday cakes. This lady bug cake was an 8" and 10" round cake black bottom cake (chocolate cake with cream cheese and chocolate chips) serves 50. Lady bug is edible too, she was made out of rice krispies.

This cake was modeled after our previous baby shower cake (pink version). I made a few changes: no banner, no bow, and adding a balloon "Welcome Baby Cannon."

Last cake was a whale theme for a baby girl shower to match the party invitation. I wish I had more time yesterday so I could put mama's whale splash on too! The cake was an 8" round cake, serves 20 - vanilla cake with strawberry buttercream, fresh macerated strawberry,  and chocolate ganache. I think I should call it Neapolitan!
Thanks for looking!

Sunday, November 14, 2010

It's not too late for Halloween Post!

I love Halloween! I didn't grow up knowing anything about it, but now that I live here in America I have an excuse for another festive. Halloween colors are just so bright. It's so perfect for decorating party cookies, cupcakes, and cakes. One of my favorite project was the Halloween Baby Shower Cookies:

All these are sugar shortbread cookies and colored with royal icing. The addition of the pink little bow are just perfect for the occasion! They are not scary at all:)


We made a new set of Halloween sugar cookies design, witch hat, shoes broom, cauldron,candy corn, bat, ghost, and pumpkin.


Fun decorated Halloween Cupcakes and Cakes:


 This little mermaid cake was a blackbottom cake, covered with fondant. It serves up to 75 guests.


Ben and I didn't get a chance to dress up this year, due to crazy busy week at the shop. We are thankful and blessed to have the support from all of you! Thanks for looking!