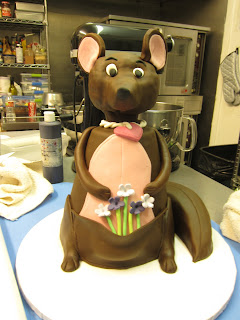
Now, planning and constructing a cake of such enormity was no easy task - fondant is a tricky material to work with, and an oddly-shaped cake often calls for a more cautious approach and tedious execution. Yet despite the challenging nature of the project, it was still one of the most fun and unique challenges that I have ever undertaken. Witnessing the client's reaction of surprise and delight upon receiving it was definitely the most rewarding part of the experience.
The structural design of this entirely-edible marsupial was roughly modeled after the character "Roo", from Winnie the Pooh, as it was intended to have more of a whimsical, animation-inspired appearance.
The core of the body and tail consisted of tapered layers of moist pumpkin cake, sandwiching and coating with our signature cream cheese frosting before being covered with various types of fondant.
The head and limbs were sculpted from Rice Krispie Treats before receiving the fondant treatment as well.
Here is a mini tutorial for our "Roo" inspired Kangaroo:
I baked two half sheet pumpkin cakes. The cake will serve about 20 adults after the carving process. Make different circle cake templates from parchment paper. I used the tail from the cake scrap.
Stack the different layers of cake with cream cheese. Move on to the tail part, repeat the same procedure as the body part.
Crumb coat the tail part, let it set for 30 min in fridge. In the mean time, prepare different fondant colors (chocolate, pink, green, purple, lavender).
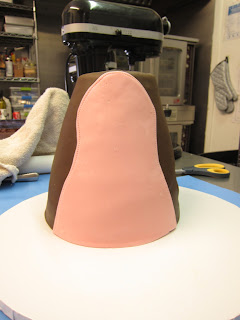
Once the body and tail set, cover them with the chocolate fondant. Add the pink accent for the belly part, chocolate for the legs and arms.0
Don't forget to add the pouch! Repeat the same procedure for the tail part, add little stitches design.
Mold the kangaroo face using rice krispies, cover it with chocolate fondant and don't forget to add dowel in the middle for support.
Attach the face and the body using a dowel, add a little princess necklace "P.O.A" ( Princess of Australia)!
Finally, I added some fondant facial features, silver crown, and girlie accents at the request of the customer, and voila! The kangaroo was ready to (carefully) hop on over to the party! Happy Birthday Angie!


This "how to" is wonderful! What a great end result! Thank you for sharing!
ReplyDeleteWOW that's the real creativity and this kangaroo's cake is really out of the world.Thanks for sharing.
ReplyDelete